We’ve done this a few times.
We know all the ways to make the installation process easy, so here you go.
Watch the video
-
Figure out how much Greenfiber you’ll need.
- First, use this handy-dandy map to determine the R-value recommended for your region. R-value indicates insulating power or thermal resistance (chart below).
- Once you know your target R-value, refer to the Greenfiber Insulation Coverage Chart (on Greenfiber Insulation product bag or see the charts we provide here). This chart will indicate, for a 1,000-square-foot area, how many bags of our insulation you’ll need and how many inches of coverage you’ll need.
- To calculate exactly how much insulation you’ll need for a specific number of square feet, you can use the following table provided by the U.S. Department of Energy Insulation Recommendations for Existing Houses.*
How to Calculate your R-Value with Greenfiber
International Energy Conservation Code Climate Map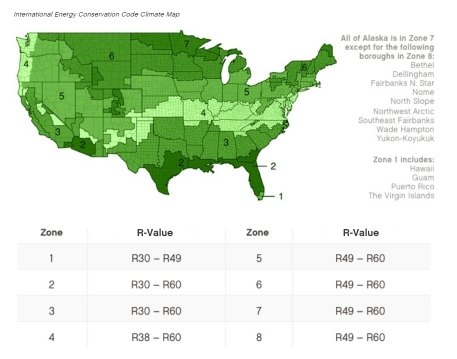
* These recommendations are cost-effective levels of insulation based on the best available information on local fuel and materials costs and weather conditions. As a result, the levels may differ from current local building codes. Our lawyers want us to add that the apparent fragmentation of the recommendations is an artifact of these data and should not be considered absolute minimum requirements.
-
Gather all the stuff you’ll need to get the job done.
You’ll probably have most of it around your house. A couple of helpful tips are to test the blower machine before you leave the store and be sure you have 100 feet of blowing hose.So here’s your list:
- The right number of bags of insulation for the R-value you need.
- A blowing machine and 100 feet of hose. Place the machine outside your home on a level surface or in your garage.
- A heavy-duty 12-gauge extension cord.
- A tarp to be placed under the blowing machine to catch excess material.
- A ladder to get into your attic if needed.
- Safety eyewear and N95 NIOSH-approved particulate masks such as a 3M model #8210 or #8511 or equivalent for protection against nuisance dust.
- Adequate lighting in the attic for installation.
- A ruler or other measuring device to monitor the depth of insulation.
- Soffit vent chutes (if needed).
- Soffit baffles.
- Metal barrier material for three-inch clearance around recessed lights and other heat sources. Do not use paper, cardboard or other potentially combustible materials as a barrier.
- A vehicle to transport the blowing machine, Greenfiber Insulation and other materials. (A pickup truck is all most people need.)
-
Get ready.
You’re almost there. Be sure to place the blowing machine on a level surface and plug it into a 20-amp, 110-volt household outlet, and make certain to keep all the insulation away from heat surfaces and recessed light fixtures.Now follow these steps:
- Identify locations of recessed lights, furnace flues, heating vents, chimneys and other sources of heat or combustion in the attic. Install barriers around heat sources with clearances of at least 3 inches from the heat source. Check your local code requirements for barriers. Heat trapped by any type of insulation can be a fire hazard.
- Use baffles or vent chutes to maintain attic ventilation. Insulation should not cover attic soffit vents.
- Determine the desired installed thickness of the insulation, and then measure and mark the rafters as a guideline to be used during application.
- Prepare a rigid barrier around the attic access hole to prevent insulation from falling out when you open the attic door. The barrier should be as tall as your installed insulation height.
- Place the blowing machine on a level surface outside the building or in a garage. (Oh, yeah, you already did that.)
- Plug the machine into a 110-volt electrical outlet (20 amps or greater) using the shortest, heavy-duty extension cord possible (minimum 12-gauge).
- Attach the hose to the machine. Run the hose from the machine through the attic access hole into the attic, avoiding sharp bends or kinks.
- Make the proper airflow adjustment by either opening your machine’s product slide gate 3/4 of the way or, on some machines, closing the air valve to approximately 1/4 inch.
- Locate one person in the attic to hold the application hose and the other near the blower to empty insulation bags into the machine hopper outside or in garage.
- Consider laying a kneeboard across the ceiling joists to provide a platform for standing or kneeling during installation.
- Open a bag of GreenFiber and gradually feed the insulation into the hopper, making sure to break the material down manually by hand to reduce clumps and prevent the blowing hose from getting clogged. Any spilled insulation should only be reused if it is free of debris. Of course, it’s important to keep your hands, feet and clothing away from moving parts inside the hopper.
-
Do it!
Okay, you’re ready to get this done. But just a couple more tips: Before you start, use soffit vent baffles to allow the soffit to stay open above the insulation for proper airflow. And after you’ve finished blowing Greenfiber, insulate the inside of the access hole cover with batt or foam board insulation to complete the job.Ready, set, go:
- Put on safety eyewear and NIOSH-approved dust mask (N95)
- Turn on the blowing machine. The product will begin to flow through the hose.
- Adjust the product slide gate to wide open or the air setting as needed.
- Begin to insulate at the corner farthest from the attic access and work back. Be careful to step on top of and not between the ceiling joists.
- Hold the hose approximately 3 feet above the installation surface and distribute the insulation evenly.
- Do not block soffits or cover heat sources with insulation unless they are type IC rated for contact with insulation.
- Fill to the desired depth, using attic markings and rulers as guides.
- Use all the bags required to achieve your desired R-value.
- Empty the blowing machine when you’re finished.
- Return the machine to the location you rented or borrowed it from.
Caution: To help avoid fire: Keep insulation at least three inches away from the sides of recessed light fixtures. Do not place insulation over such fixtures so as to trap heat unless they are type IC rated for contact with insulation. Also keep insulation away from exhaust flues of furnaces, water heaters, space heaters or other heat-producing devices. To be sure that insulation is kept away from light fixtures and flues, use a barrier to permanently maintain clearance around these areas. Check with local building or fire officials for guidance on installation and barrier requirements. (US Federal Regulation 16 C.F.R. Part 1404.4).