Installation / 08.21.24
Your guide to installing cellulose insulation for sidewall retrofit applications
Pop quiz — did you know that many homes built before 1970 have zero insulation in their wall cavities? That’s major energy loss right there. Even in new homes, sidewall cavities are the second-biggest area of heat escape. For pros and DIYers who are ready to get down to business, follow this guide for installing SANCTUARY® by Greenfiber in sidewall retrofit applications.
Wall Kit Materials
- 50 ft. of 3-inch blowing hose*
- 3-inch to 2 ½-inch reducer
- 50 ft. of 2 ½-inch blowing hose
- 2 ½ -inch to 2-inch reducer
- 50 ft. of 2-inch blowing hose
- 2-inch to 1 ½-inch inside diameter reducer
- 8 ft. of 1 ½-inch inside diameter fill tube**
- Hose clamps***
- Styrofoam plugs
- Canned spray foam
Recommended Tools for Installation
- Insulation blowing machine capable of at least 3.2 psi at the end of the hose
- Stud finder
- Putty knife
- Utility knife
- Drill and a 2 ½-inch Relton carbide hole cutter / 3/8” carbide center bit
- Filter (such as sponge)
- Dust mask
- Eye protection
- Duct tape
Sidewall Preparation
- Check the interiors and exteriors of the home, under sinks and around plumbing fixtures for any cracks and holes, and make sure to seal them with foam or caulk.
- Remember to avoid installing insulation in stud runs where there are heat-producing devices, such as a fireplace, recessed lights or a chimney.
- Do not install insulation in any structure that uses knob and tube wiring.
- Block off tops and bottoms of areas with balloon framing (areas where wall cavities are open from the attic to the basement or crawl space) before blowing.
Blower Machine Guidelines
- Place the blower machine on level ground, close to your work space and electrical outlets.
- When laying out hose, avoid sharp turns in hose.
- Put a tarp underneath the blower machine for easy cleanup. The tarp will also keep foreign objects from getting into the hopper.
- There are several types of blower machines with adjustable airflows. Double check the operating instructions before use.
Drilling Instructions
- Check that the drill bit size matches the plugs.
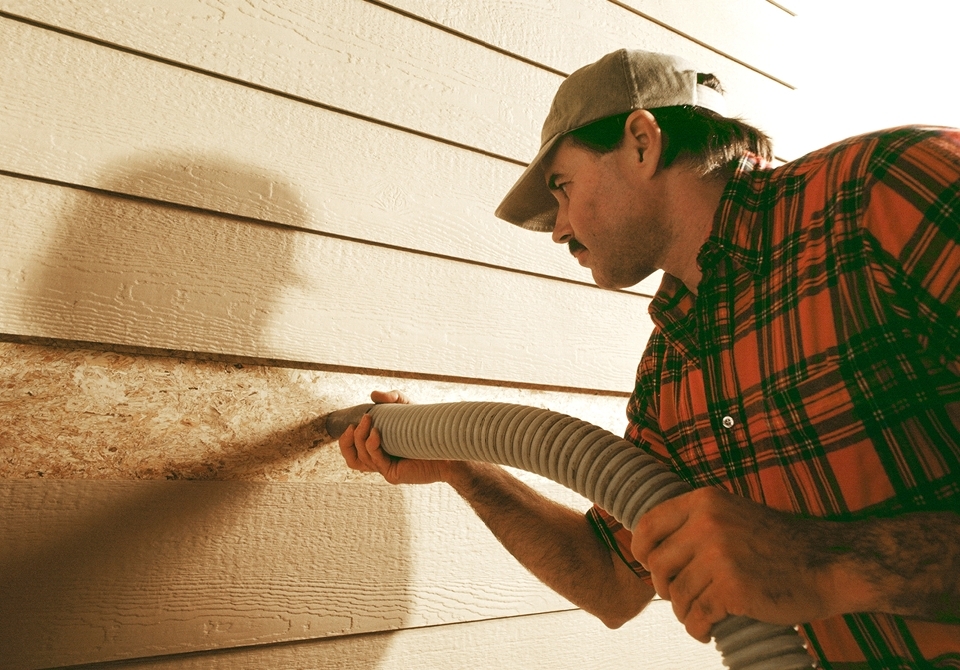
- Remove a section of exterior siding and drill a single 2 ½-inch diameter hole through the sheathing approximately 1 to 1 ½-feet from the bottom plate of the wall. Angle drill holes upward.
- Avoid drilling into areas of cold air returns.
- Mark the 8-foot fill tube every 2 feet and 6-inches from blowing end. Probe cavities by snaking the fill tube up cavity (location of blockages in walls can be determined by the markings on fill tube.) Drill additional holes in cavity, as needed, to bypass blockages.
- Older homes may have corners with diagonal bracing. Check corners of walls to determine if your house has this type of framing. If so, drill additional holes in the corners.
Installation Instructions
- Using the utility knife, cut the end of tube on a diagonal to facilitate snaking behind wiring and plumbing. Insert the nozzle into the hole, snaking up the wall cavity and turn on the blower machine. The blower will start to strain when the cavity is filled.
- Suggested beginning settings for Insulation blowing machine:
- Material gate set to 25% of total opening.
- Air setting by calibrating blower speed using pressure gauge
- Insert cut end of the tube through the filter into the 2 ½-inch drilled hole and feed to within 6-inches of the top of the stud cavity. Note any fire stops or other obstructions. Drill additional holes as needed if obstructions are present
- Turn on insulation blowing machine (Hold tube in place 6-inches from top). As material begins to flow, the cavity will fill bottom to top. When you feel resistance from the tube, the cavity is full - DO NOT STOP BLOWING. You will now begin the Dry Dense-Pack Procedure where the material is compressed in the cavity and excess air is forced out the entry hole.
- As you feel pushback, switch the machine to air to air then ramrod the material in the cavity until you empty the hose. Dense-pack 2 to 2 ½ ft. with the material left in the hose. This will also help to prevent clogging.
- Once the tube is empty, turn the machine back to fill and continue filling the cavity. When you feel resistance again, switch back to air and dense-pack. Repeat until the wall cavity is full and the fill tube comes out to the 6” mark. Note: It takes about 3 times to fill an 8-ft. wall cavity; about 4 times to fill a 6-ft. wall cavity.
- Once the entire cavity is Dry Dense-Packed, retract the tube through the entry hole, jab forward 3 to 4 times finish Dry Dense-Packing the entry area. Turn off the blowing machine and keep the tube in the hole for 3 to 4 seconds before fully removing.
- After filling each hole, check the end of the fill tube to make sure there is no material blocking the opening. A wire coat hanger or screwdriver can be used to unclog the fill tube. If this doesn’t work, remove the fill tube from the hose and clear the blocked material by closing the gate and blowing excess material into the trash. Reattach the fill tube once the hose is empty.
- Place plugs into the holes after the cavities have been filled. Seal the plugs with canned spray foam as needed.
- When you are done with the project, close the feed gate on the machine before transporting.
* Ensure that there are no holes in the hoses to prevent the material from clogging.
** All weather recommended
*** Recommended to double clamp every connection
Find more information on installation instructions for sidewall retrofit applications here.
- Category: Installation